General Overview
The Image Annotation Tool (IAT) is Web-based application designed for the annotating of images. Annotations take the form of labels associated with areas on the images. The tool was initially developed for a histology course, but can be utilized in numerous other disciplines. For example, any task requiring the labeling of maps, illustrating art images, or highlighting elements of a graphic can easily be accomplished with the tool. The IAT has been designed for classroom use, so the concept of class libraries and different user roles such as student or instructor are part of the environment.
The IAT has two main components. One component is used to keep images organized, the second component is used to create layers of annotations on images. The IAT uses a library and collections-within-a-library metaphor to organize images. Every user of the tool has a personal library where images can be uploaded and organized. Images can then be organized into collections. A collection can hold images for use in the third class session, for example. Likewise, images associated with an artist can be placed into a collection. In addition to personal libraries, the IAT allows for the creation of class libraries visible by all members of that class.
A third component of the IAT is used to manage users and course affiliations. This administrative component is restricted to staff that play an administrator role. Documentation on this component is available elsewhere.
Accessing the IAT
The IAT is accessible here. You will be asked for your University Network ID (UNI) and password. These are the same credentials you use to log in to Columbia Web sites or to check your e-mail.
Managing Images
After logging into the IAT, a navigation menu is provided along the left side of the window. This navigation menu includes your personal collections - My Images - and Shared Images for any classes that you are a member.
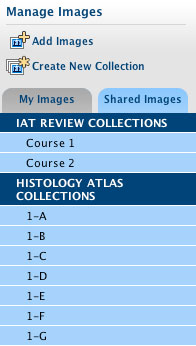
My Images
A personal collection area is generated for each user of the system. Images in "My Images" are given a number of properties including ownership and date uploaded.
Collections
Collections are any set of images that you have decided to group. An image can be part of multiple collections, so that an image by Picasso can be in a collection of images by Picasso and in a collection of 20th century paintings. Collections have a preference page where the collection properties such as title and description can be set or modified.
Shared Images/Course Collections
An instructor can create special collections called course collections. Course collections function just like regular collections, except that these collections are also visible to any member of the course. Students will see these collections as special libraries.
Managing Collections and Images
Uploading Images
A first step for most users is to take images from your computer and upload into the IAT system. IAT accepts JPG format images. Images in other formats must be converted to JPG prior to uploading into the IAT. To upload an image, click on the Add Image button atthe top of the navigation bar. After completing the form page that includes image selection and metadata information for the image such as title and description, the image is uploaded and becomes part of My Images.
The upload form can also accept ZIP files containing numerous JPG files. This method makes it easy to upload many images in one step. The system will use the file name to give each image a title in the system. Filling out the title field will append a title to the file name. Titles have a maximum length of 256 characters.
Functions that allow a user to upload images into the IAT environment:
- New Collection - Add a new collection of images from your Library to the IAT.
- New Image - Upload a new image to the IAT environment.
View
The following options are available to view images in both the Library and Collection areas of the IAT:
- List of Images - View images in a sequencial list based on the Tiles of the image; also sortable by Image Title, Date Added, or Date Modified.
- Thumbnail Images - View images by title with a small thumnail image of the actual image.
- Slideshow - Order and present your images in a Slideshow.
Manage
User and managment preferences can be accessed with this group of functions:
- Library Preferences - The Title, Image Dimensions and library image Permissions can be changed from this option.
- Collection Preferences - The Name and Description of a collection, and the Permissions of a collection can be channged.
- Re-order Image Sequence - Use this function to revise the arrangement and order of images for the Slideshow feature of IAT.
Move
Makes available the Libraries to which you can move a collection. Select the available Library from the drop-down menu, and select 'Move'. Note this option is only available to instructors, teaching assistants and adminstrators.
Add/Delete
The options to include/add or delete images will appear in the list and thumbnail view of a library or collection.
- Include Selected Images - Images in a library can be included in a collection. Images will still remain in the owner's library.
- Delete Selected Images - The owner of an image (the person that uploaded an image is the owner) can delete the image. The image will be deleted from the owner's library and ALL collections the include has been included in.
To select an image to add to a collection or delete from the library the image must be select by selected the checkbox next to each image title. The checkbox icon will select all images on the screen. After selecting the images the user may choose the option to delete the images from all collections and libraries or to include the image in other collections. These options appear below all the images on the screen.
Search
Search of all images within a Library, it's relating Collections, and annotations. The search is based on a keyword.
Drawing Tool
Annotation
When you choose to annotate an image, a popup window will open and you will see the IAT load the image and its annotations. Initially, the size of the popup should be the same size as your original window, but you can resize it and the tool will adjust to fill the window. Note the different areas of the tool interface:
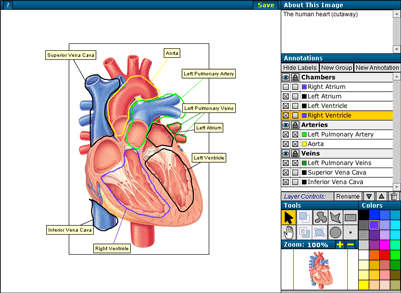
The image viewport is the most prominent area, and it contains your image. The image description box is in the upper-right corner. The annotations palette is on the middle of the right side. The tool palette, zoom navigator, and color palette are all in the lower right corner.
Zooming and Panning
The image can be viewed at many preset zoom levels. Initially, the largest zoom level which allows the entire image to be seen within the viewport is chosen. You can zoom in or out by using the "+" and "-" buttons that are on the right side of the zoom control bar. The current zoom level is displayed in the middle. At 100% zoom, the image is displayed at its actual resolution. At higher zoom levels, the image appears larger, but no additional detail can be seen. At smaller zoom levels, the image appears smaller. At all times, a miniature version of your image appears inside the zoom navigator. If you are zoomed in close enough, you can see a red rectangle in the zoom navigator. This rectangle represents the edges of your viewport, and it will help you see which part of the image you are looking at if you are zoomed in.
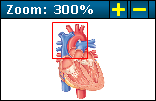

There are two ways to move the image around in the viewport. One way is by using the Hand tool (pictured above). To use it, you must first click the Hand tool button located in the tool palette. You will notice that it becomes highlighted, indicating that the tool has become the active tool. Only one tool may be active at a time. Once you have chosen the Hand tool, you can use it by clicking anywhere on your image and dragging it around the viewport. This will come in handy when you are zoomed in, and allows you to see any part of the image. The other way to pan the image is by clicking on the miniature version of your image in the zoom navigator. The viewport will pan to center around the point on which you clicked. You can also drag your mouse inside the zoom navigator and the viewport will follow. If you are zoomed out far enough that the entire image is visible in the viewport, clicking in the zoom navigator will center the image.
Annotations and Groups
The IAT allows you to organize your annotations into groups. Groups serve purely organizational and convenience purposes, and, although you can give them a title, do not have a label that can be seen on the image itself. As a basic organizational constraint, all annotations must be in a group. To accommodate for this, the first time you open an image for annotation, a group will be created for you with the title "default". The annotations palette lists all your groups and annotations for the image you are annotating. Groups are displayed in the palette in bold text. Annotations are displayed with regular text and are indented with a square displaying the annotation color.
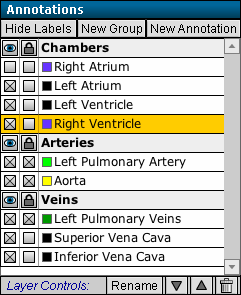
The term "layer" will be used as a generic term that could indicate either a group or an annotation. In the IAT, there is one and only one layer selected at all times. The currently selected layer is displayed in the annotations palette with an orange background. To create a new annotation, click the New Annotation button on the annotations palette. A dialog box will appear prompting you for the name of the new annotation. Type in a name and press the Create button. Your annotation will appear in the annotations palette and a label will be placed near the upper left corner of your image. Note that if you have zoomed or panned the image such that you cannot see the upper left corner of your image, you will also not see the label that was placed there. Additional labels will be placed in a cascading pattern progressing top-to-bottom, left-to-right. Also note that when creating a new annotation, it will be placed in the currently selected group (or, if an annotation is selected, the same group as that annotation). You can indicate regions of the image relevant to this annotation using the drawing tools. To create a new group, click on the New Group button. Type in a name and press the Create button. The new group will appear at the bottom of the layer list in the annotations palette. The lock and eye symbols are explained later in the "Working With Shapes and Labels" section of this help document.
Annotating Your Image
You have several drawing tools at your disposal for use when annotating the image. Each of them can be used to outline or demarcate an area on the image which is relevant to a particular annotation. To do so, you should first select the desired annotation layer in the annotations palette. Next, click on a drawing tool button from the right part of the tools palette.
Drawing Tools
 Freehand Shape - The Freehand Shape tool is used to draw a curved shape. To use it, click (and hold) on the image where you want to begin drawing the shape, and then drag the mouse around to draw your shape. When you release the mouse button, the shape will be closed automatically by drawing a line from where you released the mouse to the original location you began the shape.

Polygon - The Polygon tool is used to draw shapes with straight edges. To use it, click (and release) on the image where you want to begin drawing the shape, then click again where you want each successive vertex of your polygon to be. To finish the shape, click on the first point of your polygon (it will be marked).
 Rectangle - The Rectangle tool is used to draw rectangles. To use it, click (and hold) on the image where you want one corner of your rectangle to be. Drag your mouse to where you want the opposite corner of the rectangle to be, and then release the mouse button.
 Circle - The Circle tool is used to draw perfect circles. To use it, click (and hold) on the image where you want the center of your circle to be. Then move the mouse away from the center and release the mouse button when you see that the circle is the size you want.
 Point - The Point tool is used to draw a single point on the image. To use it, click (and release) on the image where you want the point to appear.
The Other Tools
Aside from the drawing tools, there are also some shape modification tools that are on the left half of the tools palette.
![]()
Arrow - The Arrow tool is used for selecting shapes and/or moving them on the canvas. To move a shape, you must first have chosen the arrow tool. Then click (and hold) inside the area of the shape you want to move and then drag the shape around with the mouse. When you release the mouse button, the shape will stop moving and it will be selected. To use any of the other shape modification tools, you must first select a shape. You can select a shape easily by clicking (and releasing) inside the area of a shape. When a shape is selected, a dotted-line rectangle will appear around the shape. If this does not appear, then the shape has not been selected (it may be locked).

 Bring Forward/Send Backward - The Bring Forward and Send Backward buttons are used to rearrange the depths of shapes that you have drawn. For example, to bring a shape forward, first select the shape. Then click the Bring Forward button as many times as needed to bring it to the desired depth. The Send Backward button does exactly the opposite. Every shape occupies a layer of depth and exists only on one layer, much like a collage. However, unlike a collage, each layer of depth is exclusive to only one shape. Every time a shape is drawn, is goes onto a new depth layer, placed on top of everything else. Most of the time, a shape's depth is nothing to be concerned about, but occasionally you will have two shapes that overlap or shapes that completely encompass other shapes and you will want to fix the depth ordering of the shapes so that you can manage the shapes more easily. Here is an example that will help you understand: Let's say you draw a small circle and then a larger circle around it. Because the larger circle was drawn after the smaller one, clicking in the middle of the small circle will actually select the larger one. To fix this, select the large circle, and click the Send Backward button. Clicking inside the small circle should now select the small circle. If you had drawn other shapes after you drew the small circle and before you drew the large one, you will need to click the Send Backward button one time for each of those shapes because even though they may not appear to be "in the way," they are occupying layers in between the large and small circles.
 Edit Shape - The Edit Shape button is used to adjust the shape of a shape you have already drawn. It is very useful for fixing mistakes. To do so, select a shape using the Arrow tool. Then click the Edit Shape button. For rectangles, polygons, and freehand shapes, you will see white squares appear on each vertex of the shape. Simply drag these vertices around to reposition them. For circles, one white square will appear on the edge of the circle. Drag this square left and right to increase or decrease the radius of the circle. You cannot use the Edit Shape feature with points drawn with the Point tool. When you are finished editing the shape, click anywhere on the image or click the Edit Shape button and the white square(s) will disappear. There is no way to add or remove individual vertices at this time.
Working With Shapes and Labels
To delete a shape you have drawn, simply select it using the Arrow tool and then press the Backspace or Delete key on your keyboard. There is no button on the GUI for deleting shapes. Unfortunately there is no easy way to move a shape from one annotation to another, so make sure you have the correct annotation selected in the annotations palette before you begin to draw.
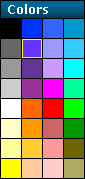
All shapes belonging to an annotation are displayed using the annotation's color. The color of an annotation can be seen in a small square left of the annotation's title in the annotations palette. To change the color of an annotation, select it in the annotations palette and click on a color in the color palette. You can choose a default color for annotations by selecting the group to which you plan on adding annotations and clicking a color in the color palette. Assigning a color to a group does not change the color of any existing annotations. The color of the currently selected layer is outlined in yellow in the color palette.
You will notice the for each shape, a line is automatically drawn to connect it to its label. When you move the label or change the shape, this line is automatically redrawn. To hide these lines (and the labels), click on the Hide Labels button on the top of the annotations palette. Hiding labels is convenient when drawing shapes because the labels can interfere with the drawing process. It is also a good way to quiz yourself on the image's contents.
There are two icons on the left side of each row on the annotations palette. These allow you to toggle the visibility and locking of its respective layer.

The first two columns in the annotation palette allow you to control the visibility and locking of annotations. The eye and lock icons appear next to each group, and two checkboxes appear next to each annotation. To hide the label and all shapes for a particular annotation, click the visibility checkbox on its row in the annotations palette. Click it again to make them visible again. To lock all shapes for an annotation to protect against accidental changes, click on the lock checkbox for that annotation. Click again to unlock. While an annotation is locked, you may move the label, but no changes can be made to its shapes. By clicking the eye or lock icons next to a group in the annotations palette, you can control the locking or visibility of every annotation in that group with just one click.
Layer Controls
The "Layer Controls" section of the annotations palette allows you to perform a small set of actions on the selected layer. To perform one of these actions on a layer (either a group or an annotation), you must first click on that layer in the annotations palette and then click on the button for the action you wanted.

The Rename button allows you to rename the selected layer. This is how you change the label text for annotations.
The Up and Down buttons allow you to re-order annotations and groups. The ordering of annotations has no effect whatsoever on the depth-ordering of the shapes you have drawn for each annotation. The order of the annotations is for your convenience, most of all. To move an annotation from one group into another, press the appropriate reordering button repeatedly until the annotation moves into the desired group. Changing the order of a group moves all contained annotations with it.
The Delete Layer (Trash Can) button allows you to delete the selected layer. When you delete an annotation, all the shapes you drew for that annotation will be deleted. If you delete a group, all annotations inside the group will also be deleted, so be careful!
Saving your Work
When you are finished annotating your image, click the Save button near the upper left corner of the screen. An alert box will appear to inform you that your work is being saved. If saving was successful, you can click "OK" and keep working or close the window if you are done. If an error occurred when saving, you will be informed of the error. In case of an error, you should try saving again. If you still get an error, use the error reporting feature at the bottom of the window that launched the IAT popup.

Please note that if you close the window without saving your work, all of your unsaved changes will be lost, as you will not be prompted to save!
Image Description
The "About This Image" box in the upper right corner of the IAT window contains a description of the image. If the text is longer than the box can display, you can use the scrollbars to see the overflowed text. This text is taken from the image metadata supplied either when the image was uploaded or from the "Edit Metadata" link in the image library. In the IAT you can select and copy the text to the clipboard, but it may not be edited. Technicalities
It is possible that an error will occur when loading your annotations. This should never happen, but if it does, you will see an error message immediately. If this happens to you, try clearing your browser's cache and relaunching the IAT. If you still get the error, use the error reporting feature at the bottom of the window that launched the IAT popup.
The Image Annotation Tool undergoes occasional updates. You can see what version of the IAT you are using by clicking the "?" button in the upper left corner of the IAT window. There are seperate version numbers for each of the four Flash movies used in the IAT, and they are all listed. Usually version numbers increase by 0.01 for minor updates, and they will be rounded up to the nearest integer for major updates.
Fedback
If you have comments, suggestions, or questions about this site, or are having a problem using it, please contact us using the following form.