
An In-depth Look at YouTube
As YouTube improves its video service, it becomes ever more attractive to educators. Yes, YouTube is stocked with novelty videos, but it is also now a large repository of educational material. Universities are getting into the act by creating "partner" channels (a special designation in the YouTube account system) to collect and distribute the institution's course and promotional videos. For example, Stanford, MIT, and Berkeley have well-developed partner channels. Columbia's channel is forthcoming.
Besides the obvious uses of video as a form of expression and a method of explanation, YouTube also offers a number of features that can augment the educator's use. These features include ratings, comments, sharing options, geotagging features and more. In this article, we will explore some of the recently added features that make YouTube a compelling tool in service of education.
Video Annotations
Video annotations are the inclusion of temporal notes such as explanatory text to videos in a special layer over the video. YouTube first released a rudimentary video annotations tool in June 2008. Since then, the service has added a number of improvements to the annotation system. Among the improvements is a collaborative annotation scheme, where video can be opened up for viewer annotations. Previously, only video owners could add annotations. Let's look at some of the annotation features.
The YouTube annotation editor offers three kinds of annotations: speech bubbles, notes, and spotlights. Additionally, pauses can be inserted to allow for branching. This last option is useful for situations where viewers are expected to make decisions before proceeding. The annotation editor also has a timeline view that allows for fine control of annotations. See image below:
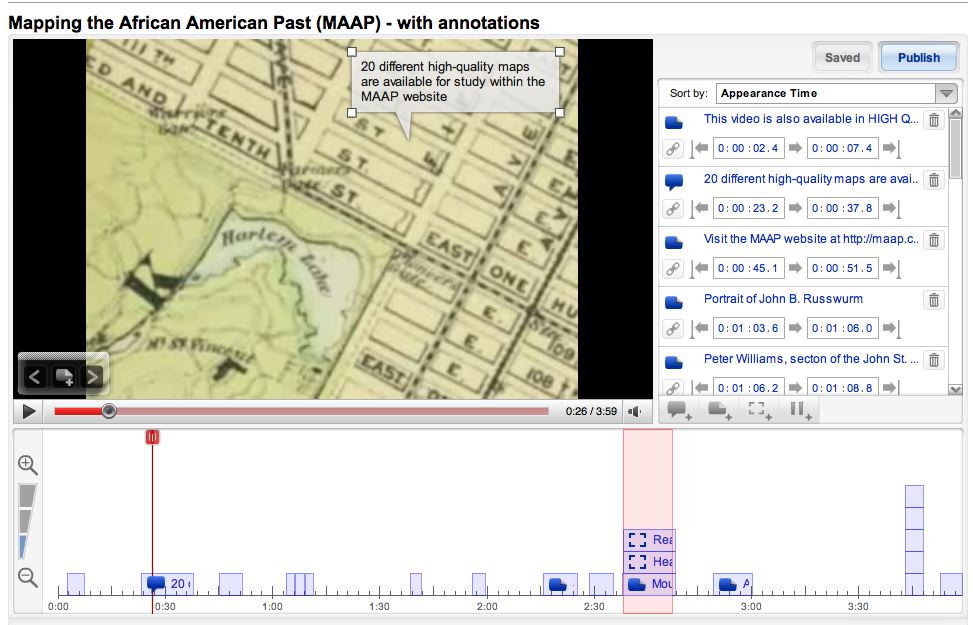
Figure: YouTube Annotation Editor (click to enlarge)
The video below from the "Mapping the African American Past" project has been heavily annotated for the purpose of demonstrating the range of annotation options:
Annotations are on by default for all viewers, but viewers can deactivate annotations in a couple of ways. First, they can turn off annotations globally using the account setting for annotations. Second, they can turn off annotations for the current video in context by toggling the annotation icon on the video play bar. When embedding a YouTube video to another site, they can disable annotations by appending the parameter. &iv_load_policy=3 to the end of the video URL.
The collaborative annotations feature allows you to invite others to add annotations to a video that you own. To invite others to annotate a video, you provide the collaborator a URL that includes a special "layer token" that will permit access to the annotation layer. This special URL is available from the annotation editor window. If the permissions to annotate are rescinded, the previously-submitted annotations remain.
For a complete reference guide to YouTube's video annotations, see the following site: http://help.youtube.com/support/youtube/bin/answer.py?answer=92710&topic=14354
Captions and Subtitles
Captions and subtitles are accompanying text tracks for videos. They function the same, but captions are generally in the same language as the audio track and subtitles are in a different language. Both types can include additional details besides a running transcript of the audio track.
To add captions and subtitles to a YouTube video, you must first obtain or create a text file containing information to accompany the video. The text file must be of a specific filetype (.sub or .srt) and should include a series of entries separated by a blank line containing start and end times and the caption text. For example:
- 0:01:20.250,0:01:23.8
Text shown at 1 min 20.25 sec, until 1 min 23.8 sec
Time is measured from the start of the video in these units:
- HH - Hours starting at 00
- MM - Minutes (00-59)
- SS - Seconds (00-59)
- FS - Fractional Seconds (0-999)
When the text file is ready, find your video and use the 'Edit' option to upload the text file with the captions. Shortly thereafter, the captions will appear on your video. See this example from MIT.
YouTube's documentation on captions and subtitles: http://help.youtube.com/support/youtube/bin/answer.py?answer=100077
Time Linking
There are times when it is important to reference a particular point in a video. Highlighting a video this way can be used to complement an argument, create a video quote, or bypass secondary material. This can be accomplished by adding a parameter to the end of the YouTube video URL.
To specify a starting point at 1 minute 45 seconds in the video timeline, append a parameter with the following syntax: "#t=1m45s".
To show how this works, here is a recent talk by Frank Moretti, linking to his explanation of memorization in antiquity at 2 minutes, 20 seconds into the video:
http://www.youtube.com/watch?v=xfQ0ccBhu1I#t=2m20s
HD and High Quality Videos
Videos uploaded to YouTube can now be viewed in standard quality, high quality or in HD quality, with a resolution of up 1270 × 720 pixels. Uploaded videos must be processed appropriately to be hosted in high quality or HD format, and YouTube offers an article on how to optimize your videos within its help section.
From a viewing perspective, choosing the video quality is simple: select either the HD or HQ buttons on the video play bar. For both of these options, we suggest that you have a high-speed network connection.
When embedding or linking to videos, it is possible to control the quality desired by appending either of these parameters to the end of a YouTube video URL:
* &fmt=1 for normal quality video (H.264)
* &fmt=18 for high quality (HQ) video (H.264)
* &fmt=22 or &hd=1 for HD video (H.264)
An example of HQ and HD video can be seen in this overview of the Brownfield Action project. The video will load in HQ first. There is an "HD" button on the play bar when playing back the video that can be used to toggle the video quality. In this case, you can toggle between HQ and HD. (Note that HD versions may not be viewable on all computers):
You can also open this HD video in a larger window by selecting the link below:
http://www.youtube.com/watch?v=4JIUvbcQvbI&fmt=22
Licensing and Downloading
In early 2009, YouTube began a pilot period involving a small collection of universities to allow downloading of video files. In the example below, a "Download Video" option is available on the lower left hand side of the video player. In tandem with this trial feature, YouTube is now allowing users to apply a Creative Commons license to videos.
Here is an example of these two features from UC Berkeley's courses series, a guest lecture on intellectual property and search.
